Note: This text was originally published on my Medium blog on September, 2020..
Scenario: Link to heading
We are developing an SPA with a robust architecture and want to make it available in three different environments: Development, Stage (QA), and Production (we might also have two production environments). Each version of the App should consume the APIs of their respective environments.
Problem: Link to heading
The packaging does not allow for environment variables to be changed at runtime.
Solution: Link to heading
There are some solutions available, but here we will deal with one that is very simple to apply. In this specific case, we will be making changes in a project started from “create-react-app”, but there’s nothing to prevent the solution from being used with other technologies, such as Vue.
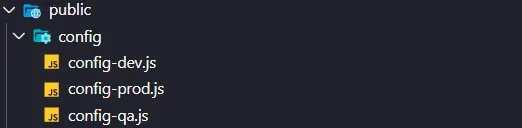
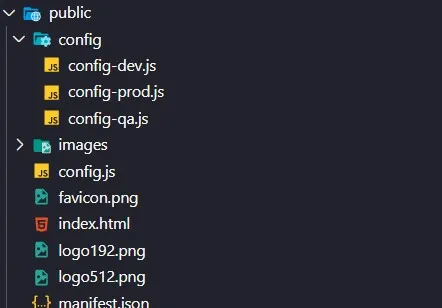
1 — Organization and storage of environment variables Link to heading
Let’s start by creating 3 files (one for each environment) in the public folder:
2 — Declare config.js before React executes Link to heading
We need to call our config.js directly in the index.html to save our variables in the browser before the services are executed (which would result in undefined):

3 — Configure services Link to heading
Now we need to make our services consume the routes saved in the window object. For organization, let’s create an environments folder inside our project with a single file index.js and just one line of code:
Now with a simple import ENV from '@environments' we can access the routes and consume them in our services.
4 — Configure local development environment Link to heading
We need to configure our local development environment so that it is possible to use the npm run {env} command and automatically generate the content of the config.js file we previously created.
Let’s execute npm install cpy-cli to install the cpy-cli library, which allows us to copy and rename files.
Now let’s configure the scripts in package.json:
"scripts": {
"dev": "npm run env:dev && node scripts/start.js",
"qa": "npm run env:qa && node scripts/start.js",
"prod": "npm run env:prod && node scripts/start.js",
"env:dev": "cpy ./public/config/config-dev.js ./public/ --rename=config.js",
"env:qa": "cpy ./public/config/config-qa.js ./public/ --rename=config.js",
"env:prod": "cpy ./public/config/config-prod.js ./public/ --rename=config.js",
"start": "npm run env:dev && node scripts/start.js",
"build": "node scripts/build.js",
"test": "node scripts/test.js"
}
Explanation:
When we execute an npm run {env}, our script will copy the config-{env} file to the root of the public folder and rename it to config.js, replacing the current file (which in this case is empty).
5 — Shell Script and Docker Link to heading
We’ll create a shell script (for organization, this could be passed directly in the Dockerfile):
#!/usr/bin/env bash
ARG1="$1"
echo "Configuring environment for ${ARG1}"
cp "/opt/bitnami/nginx/html/config/config-${ARG1}.js" /opt/bitnami/nginx/html/config.js
set -o errexit
set -o nounset
set -o pipefail
# set -o xtrace # Uncomment this line for debugging
# Load libraries
. /opt/bitnami/scripts/libbitnami.sh
. /opt/bitnami/scripts/libnginx.sh
# Load NGINX environment variables
. /opt/bitnami/scripts/nginx-env.sh
print_welcome_page
info "** Starting NGINX setup **"
/opt/bitnami/scripts/nginx/setup.sh
info "** NGINX setup finished! **"
/opt/bitnami/scripts/nginx/run.sh
echo ""
exec "nginx -g 'daemon off;'"
and we will save it as environment-tag.sh inside our public folder’s config directory.
Explanation:
When executing the container, docker run, we will pass a parameter (in this case dev, qa, or prod), our shell file will receive this parameter, assign it to ARG1, and from there copy the respective file (config-dev, config-qa, or config-prod) to the root of the public folder (which will definitely be consumed).
Now we need to configure our Dockerfile to execute the shell script:
FROM node:12.14.0 as build-stage
WORKDIR /usr/
COPY package*.json public config scripts src ./  ./
RUN npm install && \
npm run-script build
FROM bitnami/nginx:1.17
COPY --from=build-stage /usr/build/ /opt/bitnami/nginx/html
COPY nginx.conf /opt/bitnami/nginx/conf/nginx.conf
USER 0:0
RUN ["/bin/bash", "-c", "chmod +x /opt/bitnami/nginx/html/config/environment-tag.sh"]
ENTRYPOINT ["/opt/bitnami/nginx/html/config/environment-tag.sh"]
CMD ["dev"]
Explanation:
USER runs chmod as root.
ENTRYPOINT executes the shell script.
CMD defines a default parameter, which can be changed by command line when executing the container: docker run [image-name] {arg}.
Ready. Now we can save time by generating just one image and making as many deploys as we want in as many environments as we want:
docker build --tag project:1.0 . // build
docker run -ti project {env} // replace {env} with dev, qa, or prod